|
Due to this being a blog page, the build log is actually in reverse order. You will have to scroll to the bottom of the page to view the first post.
0 Comments
With the video transmitter connected to the quadcopter you should NEVER apply power to the copter without an antenna connected as the tx requires is to function as a resistor also so that the inner circuitry isn't fried.
For FPV in the RC hobby there are only a few things you need to buy, however there are some rules and regulations that you need to abide by. The following rules are general and not in much detail so for more in depth information please visit http://www.fpvuk.org/ as they have all of the information you will need. But to my understanding these are the main ones to stay safe: 1. Always fly FPV with a spotter so that when you are looking at the screen your spotter can keep tabs on your aircraft for spacial awareness. 2. Use either CE certified FPV transmitters or sub 25mW on 5.8GHz. This is because 5.8GHz is used on other wireless devices and these can be disrupted when the power output is above this. 3. Don't use your drone to fly to areas you are not allowed to go to, e.g. other people's property, areas near runways or planes, near large buildings/civilization and don't fly over other members of the public. If you follow these rules you are unlikely to come into any conflict with people but if people do have an issue with where or how you are flying, simply be honest about what you are doing and show them that it is solely for entertainment purposes, this way results in everyone being happy. Now for my chosen components: FPV transmitter: http://www.hobbyking.com/hobbyking/store/__62608__ImmersionRC_5_8GHz_25mW_Video_Transmitter_A_CE_Certified_NexwaveRF_Powered_Video_Link_UK_Warehouse_.html FPV receiver: http://www.hobbyking.com/hobbyking/store/__72926__FR632_Diversity_5_8GHz_32Ch_Auto_Scan_LCD_A_V_Receiver_UK_Warehouse_.html Screen/goggles: http://www.hobbyking.com/hobbyking/store/__62919__Quanum_DIY_FPV_Goggle_Set_with_Monitor_KIT_UK_Warehouse_.html Antennas (as the standard whip antennas don't achieve great results: http://www.hobbyking.com/hobbyking/store/__77915__ImmersionRC_5_8GHz_Circular_Polarized_SpiroNet_Antenna_V2_RHCP_SMA_UK_Warehouse_.html (Lipo to power the ground station) http://www.hobbyking.com/hobbyking/store/__32233__Turnigy_1000mAh_3S_25C_Lipo_Pack_UK_Warehouse_.html The build is finally complete with it being able to fly perfectly with the current electronics and PID settings, now here are some final pictures of all the gear so you know what you should get at the end of the build. Now that the copter flies, the fun of upgrades begins, here is what i have planned for my personal quadcopter:
-FPV (First Person View) -Aerial video (capturing) -GPS -LEDs -Increasing flight times I hope you've enjoyed the build of this quadcopter and if you have any questions feel free to ask me via email. Will Now that the transmitter is bound to the quadcopter (nicknamed 'sheila' by friends and family) we have the ability to remotely arm the quadcopter. However, before the first flight i believe there are a few initial safety aspects to attend to.
1. Setting up the fail-safe. This is in the event of a catastrophic loss of 2.4GHz signal, this could be from you flying into a noisy 2.4GHz RF region or venturing where the signal has to pass through too many objects or where you simply exceed the range. Depending on how you want your quadcopter to safely return the ground you can either: once the signal is lost; chop the throttle and so the copter will fall out of the sky, have the fail-safe set to 10 or 20% so that the copter falls to the ground but level which should increase the surface area of the impact thus reducing the force. However the downside to this is that the copter will continue with its velocity until it lands and the motors will continue to run until the battery is flat. I personally have my fail-safe set to chop the throttle as i never exceed the United Kingdoms's UAV aerial height restrictions meaning that the copter will only fall a number of meters to the ground at most. (To do this enter the DEVO 7 radio settings, FUNCTION, then scroll down to SAFE. Scroll to THROTTLE and set your desired value. Always test these settings with the props off otherwise if you enter your values incorrectly you could seriously injure yourself) 2. FLY AWAY FROM HOUSES/BUILDINGS. Flying near these will only result in the annoyance of the owners and possible damage to property and/or people. 3. FLY IN A SAFE OPEN AREA. This means a public/empty field where you are allowed to fly but even so take the precautions so that no one including yourself will get hurt. 4. For your first flights only fly close to you and at low level, this quadcopter is quite large and has a lot of power so a slip of the finger and it could be 10 or more metes up in seconds. Flying a drone when it is vertically upwards is very difficult, especially for beginners. Once all of these have been followed you should be able to fly your quadcopter with more and more skill which if you purchase a camera or already have one, you will be able to enter the world of aerial photography and FPV. The more you fly and practice, the better you will become. This procedure is different for each brand of radio but as i used a Walkera devo 7 transmitter, i will tell you how to do this. NOTE, you should have the propellers off for this part of the setup as a safety precaution.
Add 5v of power to the receiver (rx) via any free servo connection (usually use power from the kk2 or from a BEC) it will begin to flash red quickly indicating that the rx is ready to bind, now turn on your devo 7 radio and the red light will now be a solid red. This means that the rx and tx are bound although not permanently. To do this with the walkera transmitters you need to turn "FIX ID" on in the menus, (model menu>FIX ID) turn it on and then there will be a code, send this to your receiver and they will be bound until you unbind them. For the propellers i decided to use cheap plastic 8038 props as under a budget and with the 1100 kv motors i already had installed, 8038 would give the perfect lifting power against amperage draw ratio. The 8038 props could be switched out to accustom larger props as the ESCs in this build are rated up to 30 amps, however i have not tested this so i cannot speak from experience. Choosing the props was difficult when i didn't understand what the numbers meant, for instance 8038. What does it mean? There are two numbers here, 8 and 38. These correspond to the diameter and pitch of the propeller (inches) so the props i used are all 8 inches in diameter and have a pitch of 3.8 although the pitch isn't 3.8 inches, the theoretical maximum pull though a closed system per revolution for this prop would be 3.8 inches. This was my choice of propeller but if you wish to change these dimensions, please be mindful of the fact that increasing the diameter and pitch will increase the amps drawn which will effect flight times and if your battery is not rated up to the amps you are using, you will damage the battery.
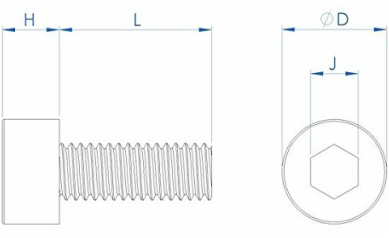
To install the props was easy, simply take the four prop adapters and insert the props being sure not to tighten them too tightly or too loosely as this could either cause them to break or fly off. (remember the kk2 board in the settings will tell you the rotational direction of the motors so make sure your props correspond to the diagram on the board.) The bolts to mount the motors to the arms have arrived and i can confirm that the bolts you will need are 8mm X M3 (sold at many electrical wholesalers and online stores) Bottom right: L is the 8mm and M3 refers to the thread on the actual bolt
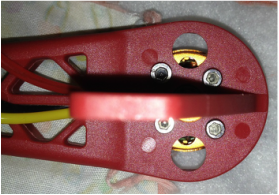
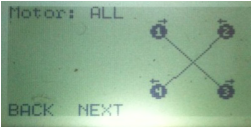 As you can see, this is how the KK2 flies the quadcopter, the ESCs have to be plugged into the KK2 (pins on the right) in order corresponding to the diagram on the right. The arrows for the time being do not matter as they refer to the direction of the motor rotation (this will be explained later on in the build guide). For us building this quadcopter, the diagram is precisely what is below. (Motor 1 Top left, motor 2 top right, motor 3 bottom left and motor 4 bottom right) the servo wires coming off the ESCs plug into the pins on the right (see picture) with motor one being the top 3 pins, motor 2 the next set of 3 and so on. Since the ESCs have a 5-Volt 3-Amp UBEC (universal battery eliminator circuit) there are no alterations that need to be made to the servo wires as the voltage has been decreased from the battery's 12V to a KK2 suitable 5V. (The ESCs maybe be attached to the side of the arms to allow for the power leads to reach the pads on the power distribution board. ) 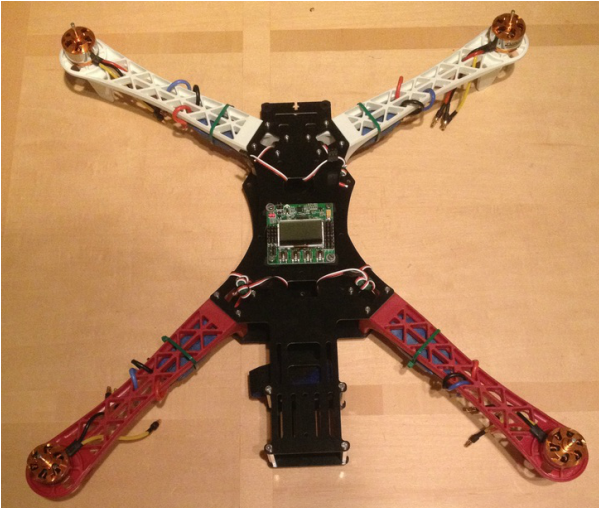 Quadcopter up-to-date  Underside of the motor mounts Underside of the motor mounts Firstly, since the screws that are supplied with the motors are too small to fit through the frame holes and then screw into the motors, you will NEED to buy 16 8mm X M3 bolts (these are the exact bolts that come with the frame kit to hold the back compartment to the metal columns) for now as you can see in the picture, i have held the motors on using these screws until my ordered ones arrive. The motor wires i have then fed through the arms so that they are underneath where the ESC wires will also be- this makes for easier and neater cable management.) This is the same for all 4 motors. 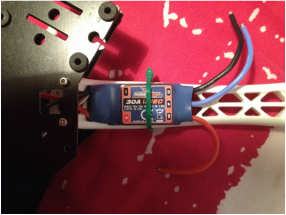 Underside of the arm Underside of the arm As you can see the ESC is placed as close to the main hub of the frame as possible so that the power leads have as much length as possible to reach the power distribution board. This doesn't hinder the ability for the signal wires to reach the motors as these are much longer and there is plenty of length. The ESC is then held very tightly on with a zip tie making for a very light attachment solution, this method is the same for all 4 ESCs.
 The flight control board (KK2) has been placed on top of the craft as shown right in the middle as this is whats needed for the quadcopter to function properly. Now, the KK2 can also be placed underneath the top plate on the bottom one which gives the sensitive board more protection, however the buttons and screen are much harder to access and so i placed it on the top of the model. (surrounding the board are 4 holes which can be used to either: attach the power distribution board to the underside, or to create a protective shield to protect the KK2 (which i may do further on through the build)
The frame doesn't come with any sort of manual but the package is fairly self explanatory. With in the box there are two large plates, 4 flamewheel style arms, 4 metal pillars and a selection of screws. The small screws are used to connect the plates to the arms and the large screws are used to connect the metal pillars to the two large plates (these are positioned at the back of the frame). Eventually you will end up with a frame looking similar to the one in the image. If you have completed this step, you are ready for the next. (Note: the small rectangular plate in the box is to be used with the 4 black vibration dampener balls at the front of the model, this can be used to hold a Gopro or Gopro styled camera) This (left) is what the top of the frame should look like with 4 screws tightly fastened. To the right is what the underside should look like (apologies that the ESCs are already attached to the frame but i took the pictures post build). Finally the bottom picture is what the completed build should look like, lightweight, sturdy and with plenty of added features this frame is ready to be turned into a quadcopter!
 Completed frame build Obviously to build a quadcopter you are going to need to buy parts (if you are a newbie like me) so first we begin with the list of parts you will need to complete this build. NEW PARTS MAY BE ADDED AS THE BUILD CONTINUES, BUT THIS WILL ONLY MEAN PERIPHERALS LIKE SCREWS AND CUSTOMISATIONS.
The build is not required to have the Transmitter and receiver that i bought as you can purchase another one, all will be compatible. Frame http://www.amazon.co.uk/NEEWER%C2%AE-Useful-X-Mode-Multicopter-Quadcopter/dp/B00C593WYU/ref=sr_1_1?ie=UTF8&qid=1421686613&sr=8-1&keywords=quadcopter+frame Motors (4 of them) http://www.hobbyking.com/hobbyking/store/__28426__D2822_17_Brushless_Outrunner_1100kv_UK_Warehouse_.html ESC (electronic speed controllers) http://www.hobbyking.com/hobbyking/store/__25986__Hobby_King_30A_ESC_3A_UBEC_UK_Warehouse_.html Flight control board http://www.hobbyking.com/hobbyking/store/__56516__Hobbyking_KK2_1_5_Multi_rotor_LCD_Flight_Control_Board_With_6050MPU_And_Atmel_644PA_UK_Warehouse_.html Li-Po battery (Lithium polymer) http://www.hobbyking.com/hobbyking/store/__26718__Turnigy_2200mAh_3S_20C_Lipo_Pack_UK_Warehouse_.html Li-Po battery charger http://www.hobbyking.com/hobbyking/store/__56512__HobbyKing_174_B6_AC_DC_Compact_LiPO_NiMh_50W_Charger_UK_Plug_UK_Warehouse_.html Power distribution board http://www.amazon.co.uk/Neewer-MultiCopter-Multi-Tri-Connection-Distribution/dp/B00GQOZZUY/ref=sr_1_1?ie=UTF8&qid=1421687152&sr=8-1&keywords=power+distribution+board Male XT60 to Female T-Connector http://www.hobbyking.com/hobbyking/store/__28433__Male_XT60_to_Female_T_Connector_1pc_bag_UK_Warehouse_.html?strSearch=xt60%20to Heat shrink tubing http://www.hobbyking.com/hobbyking/store/__40147__Turnigy_4mm_Heat_Shrink_Tube_BLACK_1mtr_UK_Warehouse_.html?strSearch=heat%20shrink Bullet connectors (you will need two of these packs) http://www.hobbyking.com/hobbyking/store/__40145__PolyMax_3_5mm_Gold_Connectors_10_PAIRS_20PC_UK_Warehouse_.html Propellers (2 Clockwise and 2 Anti clockwise) (Clockwise) http://www.hobbyking.com/hobbyking/store/__47564__Slow_Fly_Electric_Prop_8038R_Black_4_pc_UK_Warehouse_.html (Anti-clockwise) http://www.hobbyking.com/hobbyking/store/__47565__Slow_Fly_Electric_Prop_8038_Green_CCW_Rotation_4_pc_UK_Warehouse_.html LED strip (1 meter) http://www.hobbyking.com/hobbyking/store/__42154__Turnigy_High_Density_R_C_LED_Flexible_Strip_Green_1mtr_UK_Warehouse_.html Transmitter http://www.amazon.co.uk/Andoer-Walkera-Transmitter-Helicopter-Airplane/dp/B00LSOOBPW/ref=sr_1_13?ie=UTF8&qid=1421865763&sr=8-13&keywords=andoer+walkera Receiver (for transmitter) http://www.amazon.co.uk/NEEWER%C2%AE-Walkera-DEVO-RX-601-Receiver-Transmitter/dp/B00DGNXJ3S/ref=sr_1_2?ie=UTF8&qid=1421865822&sr=8-2&keywords=Rx601  If you have found this blog then you are looking to build a quadcopter, however i would like to make one thing clear before i begin, this guide is aimed at BEGINNERS. I am no expert in the RC (remote controlled) community and nor do i claim to be. I am simply a GCSE student interested in electronics who stumbled upon what developed to be a fantastic project which i am hoping will help others to achieve what i have done here.
Another thing is the parts i am using may not be the most efficient or reliable but they are what i could get my hands on and so if you wish to exchange parts or alter the design, please do so, but please do your research into your alterations as i cannot guarantee that they will work with my components. |
AuthorStudent interested in electronics and engineering documenting my projects Archives
September 2015
Catagories
All
|


 RSS Feed
